
Why did I not just get the GT package with the heated mirrors? Other than the obvious cost difference of the Sport and GT packages, I am over 6' tall and could not find a comfortable seating position in either the Touring or GT package cars due to the interior ceiling being about 2" lower with the sunroof. Hence I added back in the options that the dealer could not provide.
Parts are relatively inexpensive for this job. Parts that may be necessary are:
FE02-69-1G7 LT. HEATED MIRROR GLASS AND HOLDER $24
FE02-69-1G1 RT. HEATED MIRROR GLASS AND HOLDER $25
FE02-7-190B LT. DOOR HARNESS $133
FE02-67-200A RT. DOOR HARNESS $116
(Prices are from Mazda South). The only items I purchased were the heated mirrors for the driver and passenger sides, and decided to fabricate my own wiring harnesses. Harnesses from the doors to the mirror are not available without replacing the entire mirror housing, which is prohibitively expensive. If you fabricate your own wiring harness, make sure to use at least 20 gauge wire to support the 10 amps that the mirror heaters are fused for.
DISCLAIMER: I do not work for Mazda. The stuff you will see below is not Mazda-approved and will most likely lead to voiding parts of your warranty, and may lead to damage to your automobile, including but not limited to turning it into a smoldering wreck if you mess something up like the wiring. My RX-8 may be significantly different than yours and hence the stuff below may lead you to a different outcome than I arrived at. Please do not attempt the stuff below unless you are confident in what you are doing, as I am sure to have accidentally left out many details necessary for proper completion of this job. Please consult the Mazda Wiring Manual and Mazda Service Manual for your car for more information.
Heated Mirrors
My RX-8 had a good portion of the heated mirror wiring in place, including the necesary fuse in the fuse box, and all chassis and passenger door wiring.
Compairson of the non-heated (top) and heated (bottom) mirrors. On the bottom mirror you can see the wire traces similar to a rear-window defroster. This is the heating element for the mirror. The white goop on the back of the top mirror is a lubricant of some sort that was factory installed. I transfered as much as I could to the new mirrors. Note the two white "blobs" on the right side of the heated mirror with the metal tabs sticking out. These are the connection points for power.
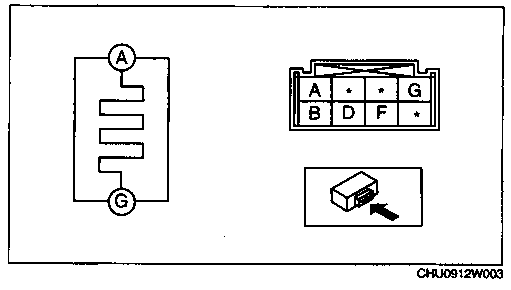
Factory shop manual drawing showing a simple schematic of the wiring for the mirror heater (left) and the connector in the door that the motors for the power mirrors (B, D & F) and heaters for the heated mirrors (A & G) attach to. This harness runs from the door into the mirror housing. Unless you have heated mirrors, you probably only have the power mirror wires (B, D & F) in your door-to-mirror-housing harness.
Passenger Side
The passenger side for my car was relatively straight forward. Power for the heated mirrors was pulled all the way through the car and through the passenger door. All I needed to do was install the heated mirror glass and make a short wiring harness from the glass to the appropriate wiring harness in the door.

I first removed the old mirror glass by carefully pushing the inner edge into the housing as far as it will go, then pulling the outer edge carefully to "pop" the mirror off the three posts in the housing. After removing the glass, the mirror housings are relatively easy to remove. After removing the door's interior panel, you will find 3 black screws behind the tweeter. After removing these screws, the mirror housing will still hang in place on the door, as it is held in place with a plastic tab toward the upper corner of the housing. I broke the tabs on both the driver and passenger sides trying to figure out how to remove them, so you are on your own here. I was able to glue the tabs back on, but there is no way for me to know whether they are doing their job (which appeared to be only to hold the mirror housings in place during assembly).
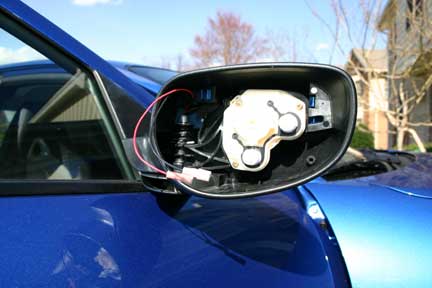
After removing the mirror housing, it is relatively easy to snake two pieces of wire through the housing following the same path as the power mirror wires.
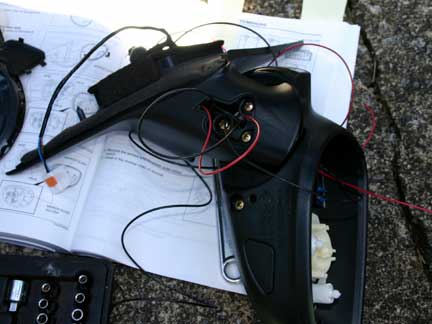
This is a picture of the mirror housing back on the passenger door. The black and red wires I pulled through for the mirror heater are visible, with pink quick-crimps on the ends which will attach to the metal tabs on the mirror.

This picture shows the interior of the passenger door. The new black and red wires coming through the door were crimped to pins and inserted into the factory power-mirror harness connector (white rectangular box just below center). See the earlier schematic of the pin-outs on for this connector. My car already had power up to this point.
Driver Side
The driver side was a bit more of a challenge. When I decided to try this, I only checked the passenger door to see how much work it would be, and assumed the driver door would be similar. In my case, the driver door did not have any of the heated mirror wiring, so I needed to pull the wiring from the chassis into the door, which added a few hours to the job. The physical mirror installation is the same as the passenger door, so I will only show the additional work for the wiring harness in the driver door.

This picture shows the driver door wiring harness between the door and the chassis. The white and blue connector (to the right of and above center) is the connection point for the door harness to the chassis harness. This confused me for quite a while, as I could see the proper wire running from the fuse box toward the driver door, but it never came out in the driver door. Turns out the power was only run to the chassis side of this connector and not into the door.

Close up of the connector between the door and the chassis. The trick here to separate the connector is to pull the blue part toward the interior of the car at the top, which will release the connector.

This is the back of the door-side of the connector. The red arrow shows where I added a wire to bring the power from the chassis-side connector into the door.

Red circle shows the tab I added in the connector for the power. I used a Molex-style contact. It was not exactly the same as what Mazda used, but was close enough to work in the connector.

For ground/common, I attached to the black wire in the power window harness using a quick-splice.

This is the driver door after surgery. As with the passenger door, I used Mazda's connectors to relay power through to the mirror.
Testing
It took a couple of days before we had another good frost for me to test the mirrors. They are actuated by turning on the rear window defroster. The mirror became warm to the touch, so you should be able to test your mirrors just by touching them instead of waiting around for a frost.