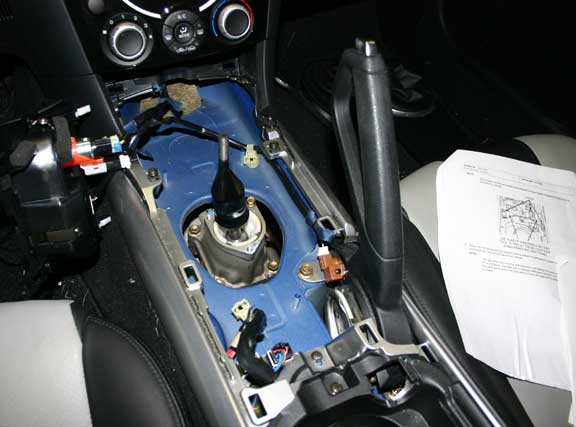
A good chunk of the center console must be taken apart to remove the shifter. Mazda has a couple of Service Bulletins on this that show where all the hidden connectors are and where to pull to snap things loose:
The flywheel I chose to use was an ACT XACT Prolite, from rx8store.net. ACT sells a flywheel/clutch/pressure plate kit, but as I only had 13k on my current clutch and could find no weight/inertia savings from going with one of their clutch/pressure plates, I stuck with the flywheel only. Replacing the clutch and pressure plate at the same time would have been trivial, other than the cost.
The general procedure is well-documented elsewhere, including the Mazda Workshop Manual, which I strongly recommend getting for this project. There are some 25 significant parts to take off the car, some easier than others. The big ones include the Power Plant Frame (PPF), transmission, driveshaft, and parts of the interior. You will need a good tool selection, including an array of 10, 12 & 14mm sockets and wrenches along with lots of accessories such as swivels and extentions, and something to remove and re-torque the flywheel nut (~350 lb-ft). I consider myself a decent amateur mechanic, and this project took me around 16 hours, not including broken bolts. Below are pictures and comments on the procedure.
A good chunk of the center console must be taken apart to remove the shifter. Mazda has a couple of Service Bulletins on this that show where all the hidden connectors are and where to pull to snap things loose:
As mentioned elsewhere, before you pull the shifter out of the transmission, you might want to vacuum around the shifter hole, as once the shifter is removed, it is really easy to get crumbs, etc, into the transmission. Also make sure to wait until all the screws are removed in the passenger compartment before removing the shifter, as the only thing worse than dropping a few french-fry crumbs in your transmission is dropping a screw into your transmission.

The transmission is a heavy piece of equipment that will need to be supported for a long time while working on the car. If you have an official tranny jack, great. Otherwise, you can fashion a jack from a piece of 2x6 bolted to your jack (thanks to carbonRX8 for notes on this). Note the pair of angled 3/8" holes on each end for cable ties.
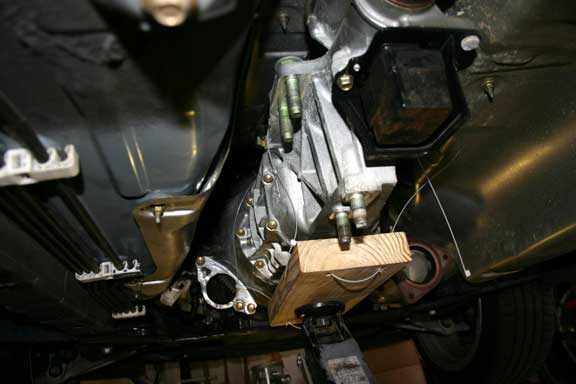
The transmission loosely attached to the tranny jack. When I jacked the car up, the front was a good 6" higher than the rear. This led to several problems, including significant tranny fluid loss from the rear of the tranny and difficulty reinstalling the tranny due to poor alignment. If you cannot get your car level on jackstands, make sure to use towels or another spacer between the jack and the tranny so the jack lifts the tranny up into the car at the correct angle. You will need to do this before dropping the tranny, as once the jack is holding the full tranny weight you won't want to be wiggling the tranny or trying to lift it off the jack.
One of the directions I usually fail to follow in the Workshop Manual is to disconnect the battery, as I like to listen to the radio in the car when working on it. In this case, however, you should do as instructed. The starter solenoid is integral to the starter motor, so you have a large diameter cable coming directly from the hot terminal on the battery to the starter. This cable will end up hanging free after you remove the starter, just looking for trouble if it is still live.
There are 5 bolts holding the tranny to the engine. Three are relatively easy to get to. Two are up near the top of the bell housing on the passenger side. The lower one of these you can see with your head up near the front of the tranny. The upper one was easiest to see with your head back near the rear of the tranny. I used a swivel and probably 24" of extensions to reach these two bolts.

Driveshaft, looking back toward the differential. Mazda hyped the driveshaft as being carbon fiber, where it is really carbon fiber reinforced plastic. Cool either way. Note the towel used to prevent scratches, as well as the silver alignment markings between the diff and the drive shaft (these were made with a Sharpie marker). I recommend wrapping the whole drive shaft in a towel, and taping it in place at this step.
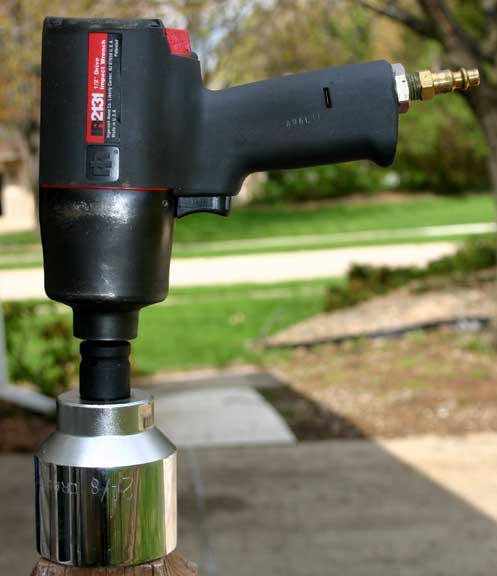
My 10 year old Ingersoll-Rand 2131 1/2" drive impact wrench, which was marketed as the "worlds most powerful 1/2 inch impact wrench", with 600 lb-ft of torque in reverse (some newer 1/2" stuff puts out more power, such as the Sears/Craftsman 19864 with 700 lb-ft and the IR 2135 with 1000 lb-ft). This guy made short work of the 54-mm flywheel bolt (as well as several others). I bought a used 2 1/8" (53.975 mm) socket for $30 after looking unsuccessfully for a 54-mm socket for less than $100. This is a non-impact socket, but had no problems (though not recommended for continuous impact duty).
I made a flywheel stopper from a 3" wide chunk of 1/4" steel (available at Home Depot/Lowes). Length is approximately 15".
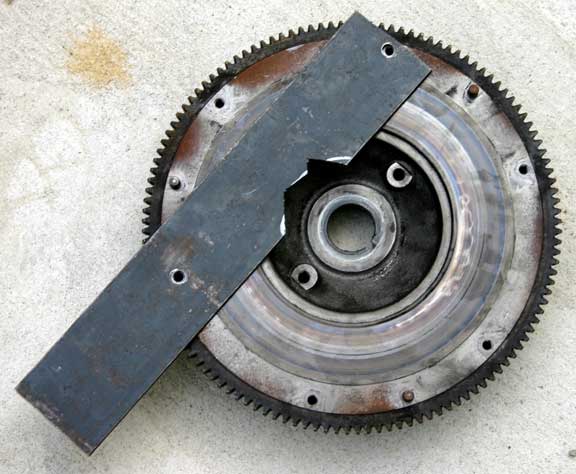
I put two holes in it to bolt to the flywheel, and cut a section from the side to leave access to the flywheel nut. The end of the stopper extending beyond the flywheel leaned up against the cross-brace just under the rear edge of the engine. Put it on the driver's side (as shown above) to loose, passenger's side to tighten.
Old flywheel off. Yes, you will need a puller to remove the flywheel, as well as a big hammer. It's a keyed-taper joint, so it is on pretty good. Leave the flywheel nut on the end of the eccentric shaft when pulling so you don't get a 20# kick in the head when it pops off.

New and old flywheels. The old weighed in at 17 (+-1) lb. The new (with counterweight) at 13.5 (+- 1 lb). Weight is not the whole story, however, as rotation inertia takes into account how far the weight is from the center. Looking at the ACT, you can see that they took quite a bit of metal from between the starter gear ring and the clutch surface. I don't have any way to measure inertia, but ACT quotes an 80% reduction.

New flywheel in. You can see the counterweight through the center holes (the counterweight is not symmetric). Install the counterweight first, then attach the flywheel to it with the included bolts. We're half-way done!

While I had the shifter pulled, I replaced it with a short-throw shifter from Richard Paul at Axial Flow. The short shifter is on the left, and the stock on the right. The picture does not make it look like it is that much shorter, but the shift distance has been cut by at least half.

I broke 2 bolts on this project. The first was removing the mid pipe from the exhaust. This bolt took me several hours over 2 days to drill out, as it was quite hard. I finally went out and bought a decent cobalt bit that I could resharpen. Cobalt-steel drills are much harder than normal drills (and much costlier -- a single 3/8" drill set me back $12 at Home Depot), and used primarily for drilling in metal. I spent probably 90 minutes getting the first 1/8" of the bolt out (destroying a combination of old TiN bits and grinding stones), then about 30 minutes to get the other 3/8" out with the cobalt bit (10 seconds drilling, 10 seconds re-sharpening, rinse, repeat). Make sure to use a cutting fluid, such as Tap Magic, while drilling to keep the bit cool. I probably ground 1" off the new bit resharpening, but it was well worth the cost to get that stupid bolt out. Home Depot sold me new hardened hardware to replace this.
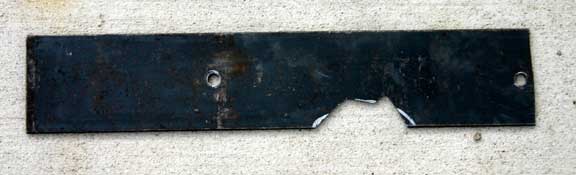
The second bolt was much more depressing. When reinstalling the tranny, I got three bolts torqued in, then broke the 4th one off in the block. Talk about nightmares. When I finally stopped screaming, I pulled the tranny back out to reveal the above picture. I have no good explaination for why this bolt broke. I was using a clicker-type torque wrench that was properly set at 30 lb-ft (spec is 28-38 lb-ft). The stud left behind in the block screwed out relatively easily with a small pair of vice-grips. The hole in the block goes all the way through (not a blind hole), so the bolt did not bottom out. In the end I got a whole new set of tranny bolts from Mazda and tossed the other 4 on principle. Everything went back together fine the second time.
Driving impressions: the whole car seems much smoother now. The biggest improvement I have noticed is starting off in 1st gear. Where the car tended to bog down and accelerate jerkingly getting from 0-15 mph, it is much smoother now.